
Listen to this article:
Somewhere in your home there’s a drawer with an old Chromebook in it. Maybe it’s an Acer C720 from 2014, or a Samsung Chromebook 3 that served your kid through middle school, or one of the millions of devices that schools purchased during the pandemic and quietly decommissioned when the Auto Update Expiration date arrived. The screen still works. The keyboard still types. The battery still holds a charge. Google just decided it was finished receiving security updates, and that was that. The things Chromebooks can’t do as consumer devices don’t matter when you’re repurposing one as a server.
You’ve probably considered recycling it, and recycling is certainly better than a landfill. But there’s a third option that the homelab community has been quietly exploring for years: turn that expired Chromebook into a home server. Not a powerful one. Not one that will replace dedicated hardware. But a free, silent, sipping-power-from-the-wall server that can handle surprisingly useful tasks around your house. One hobbyist even built a four-node Beowulf cluster from discarded Dell Chromebook 11s, stripping them to bare motherboards and networking them with Open MPI. You probably don’t need to go that far, but the point stands: these devices have more life in them than Google’s update calendar suggests.
The E-Waste Problem This Actually Solves
We’ve written extensively about the Chromebook e-waste crisis and the waves of pandemic-era devices hitting their expiration dates in 2025 and 2026. The numbers are staggering: PIRG estimated that doubling the lifespan of just the Chromebooks sold during 2020 could cut emissions equivalent to taking 900,000 cars off the road for a year, and only a third of Chromebook e-waste gets properly recycled. Google extended update support to ten years for devices released from 2021 onward, which was a meaningful step, but it did nothing for the millions of older machines that were already ticking toward expiration.
Repurposing an expired Chromebook as a server won’t solve the systemic problem. But it does something personally satisfying: it takes a device that was heading for the waste stream and gives it a genuine second life doing actual work. The hardware hasn’t gotten slower. The processor is the same chip it was the day you bought it. Google just stopped sending it software updates, and for a device running its own Linux installation behind your home firewall, that particular problem disappears entirely.
Will Your Chromebook Work? Check Before You Start
Not every Chromebook can be converted into a Linux server, and the single most important factor is whether it has an x86 (Intel or AMD) processor or an ARM processor. The vast majority of Chromebooks that work well for this project use Intel Celeron, Pentium, or Core processors. ARM-based Chromebooks using MediaTek or Rockchip chips are significantly more limited. The firmware flashing tools that make this process straightforward don’t support most ARM models, and even when you can install Linux on them, software compatibility is narrower and community support is thinner.
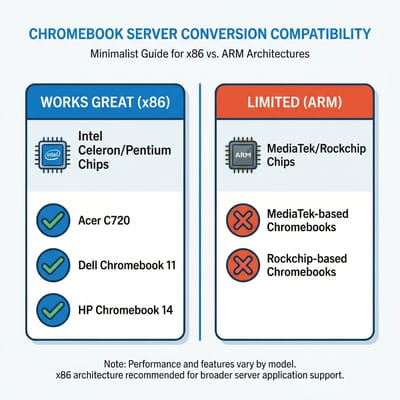
The best way to check is to visit the MrChromebox supported devices page and search for your Chromebook’s board name. You can find your board name by typing chrome://version into your Chromebook’s address bar and looking for the “Platform” line. If your device appears in the list with UEFI Full ROM support, you’re in good shape. If it’s not listed, your options narrow considerably. Popular models that work well include the Acer C720 and C740 series, Dell Chromebook 11, HP Chromebook 14 G4 and G5, Lenovo N21 and N22, and the Samsung Chromebook 3. These are all Intel-based machines that were sold in enormous volumes to schools, which means they’re cheap and plentiful on the used market if you don’t already have one sitting around.
A few practical specs to keep in mind: you want at least 4GB of RAM, though 2GB can work for very lightweight setups. Storage is less critical because you can attach external USB drives, but having at least 16GB of internal storage gives you room for the operating system and essential services. Ethernet is ideal for a server but most Chromebooks only have Wi-Fi. A USB Ethernet adapter solves this for about ten dollars and is worth the investment if you plan to run DNS services or anything that benefits from a stable wired connection.
The Firmware Flash: Making It a Real Computer
Out of the box, ChromeOS isn’t a server operating system. It’s locked down, limited, and not designed for persistent background services. The transformation happens when you replace the firmware entirely and install Linux. This is where MrChromebox’s firmware utility comes in. It’s a community project that provides custom coreboot-based firmware for ChromeOS devices, and it’s been the backbone of Chromebook Linux conversions for years.
The process involves three main steps. First, you enable Developer Mode on the Chromebook, which is a built-in ChromeOS feature that gives you access to a developer shell. Second, you disable the hardware write-protect, which on older Chromebooks means opening the case and removing a specific screw. On newer models, this can sometimes be done through software commands. Third, you run the MrChromebox firmware utility script, which flashes full UEFI firmware to the device.
A word of honest caution here: flashing UEFI Full ROM firmware is a one-way door. Once it’s done, ChromeOS is gone. The device will boot like any standard PC, which is exactly what you want for a server, but there’s a small risk of bricking the hardware if something goes wrong during the flash. Recovery from a bad flash requires specialized hardware like a CH341A programmer, which most people don’t have lying around. That said, the risk calculus is different with a device that was otherwise heading to a recycling bin. If the worst happens and you end up with a paperweight, you’ve lost nothing you weren’t already planning to discard. Just make sure the Chromebook is plugged in and don’t interrupt the flashing process.
Once the firmware is flashed, you can boot from a USB drive and install any standard Linux distribution. Ubuntu Server is a solid choice for beginners because of its extensive documentation and large community. Debian is lighter and arguably more appropriate for a device with limited resources. If you have Linux experience and prefer minimal overhead, Arch or Alpine Linux will leave more RAM and storage for your actual services. Avoid distributions that include heavy desktop environments. This is a server. It doesn’t need a graphical interface.
What Actually Runs Well

Once you have Linux running, Docker and Docker Compose become your best friends. Containers let you run isolated services without worrying about dependency conflicts, and the overhead is minimal compared to full virtual machines. A developer documented their experience running Portainer, Grafana, InfluxDB, and Jenkins CI on an Asus C300 with a low-wattage Celeron processor, and the machine handled it without breaking a sweat.
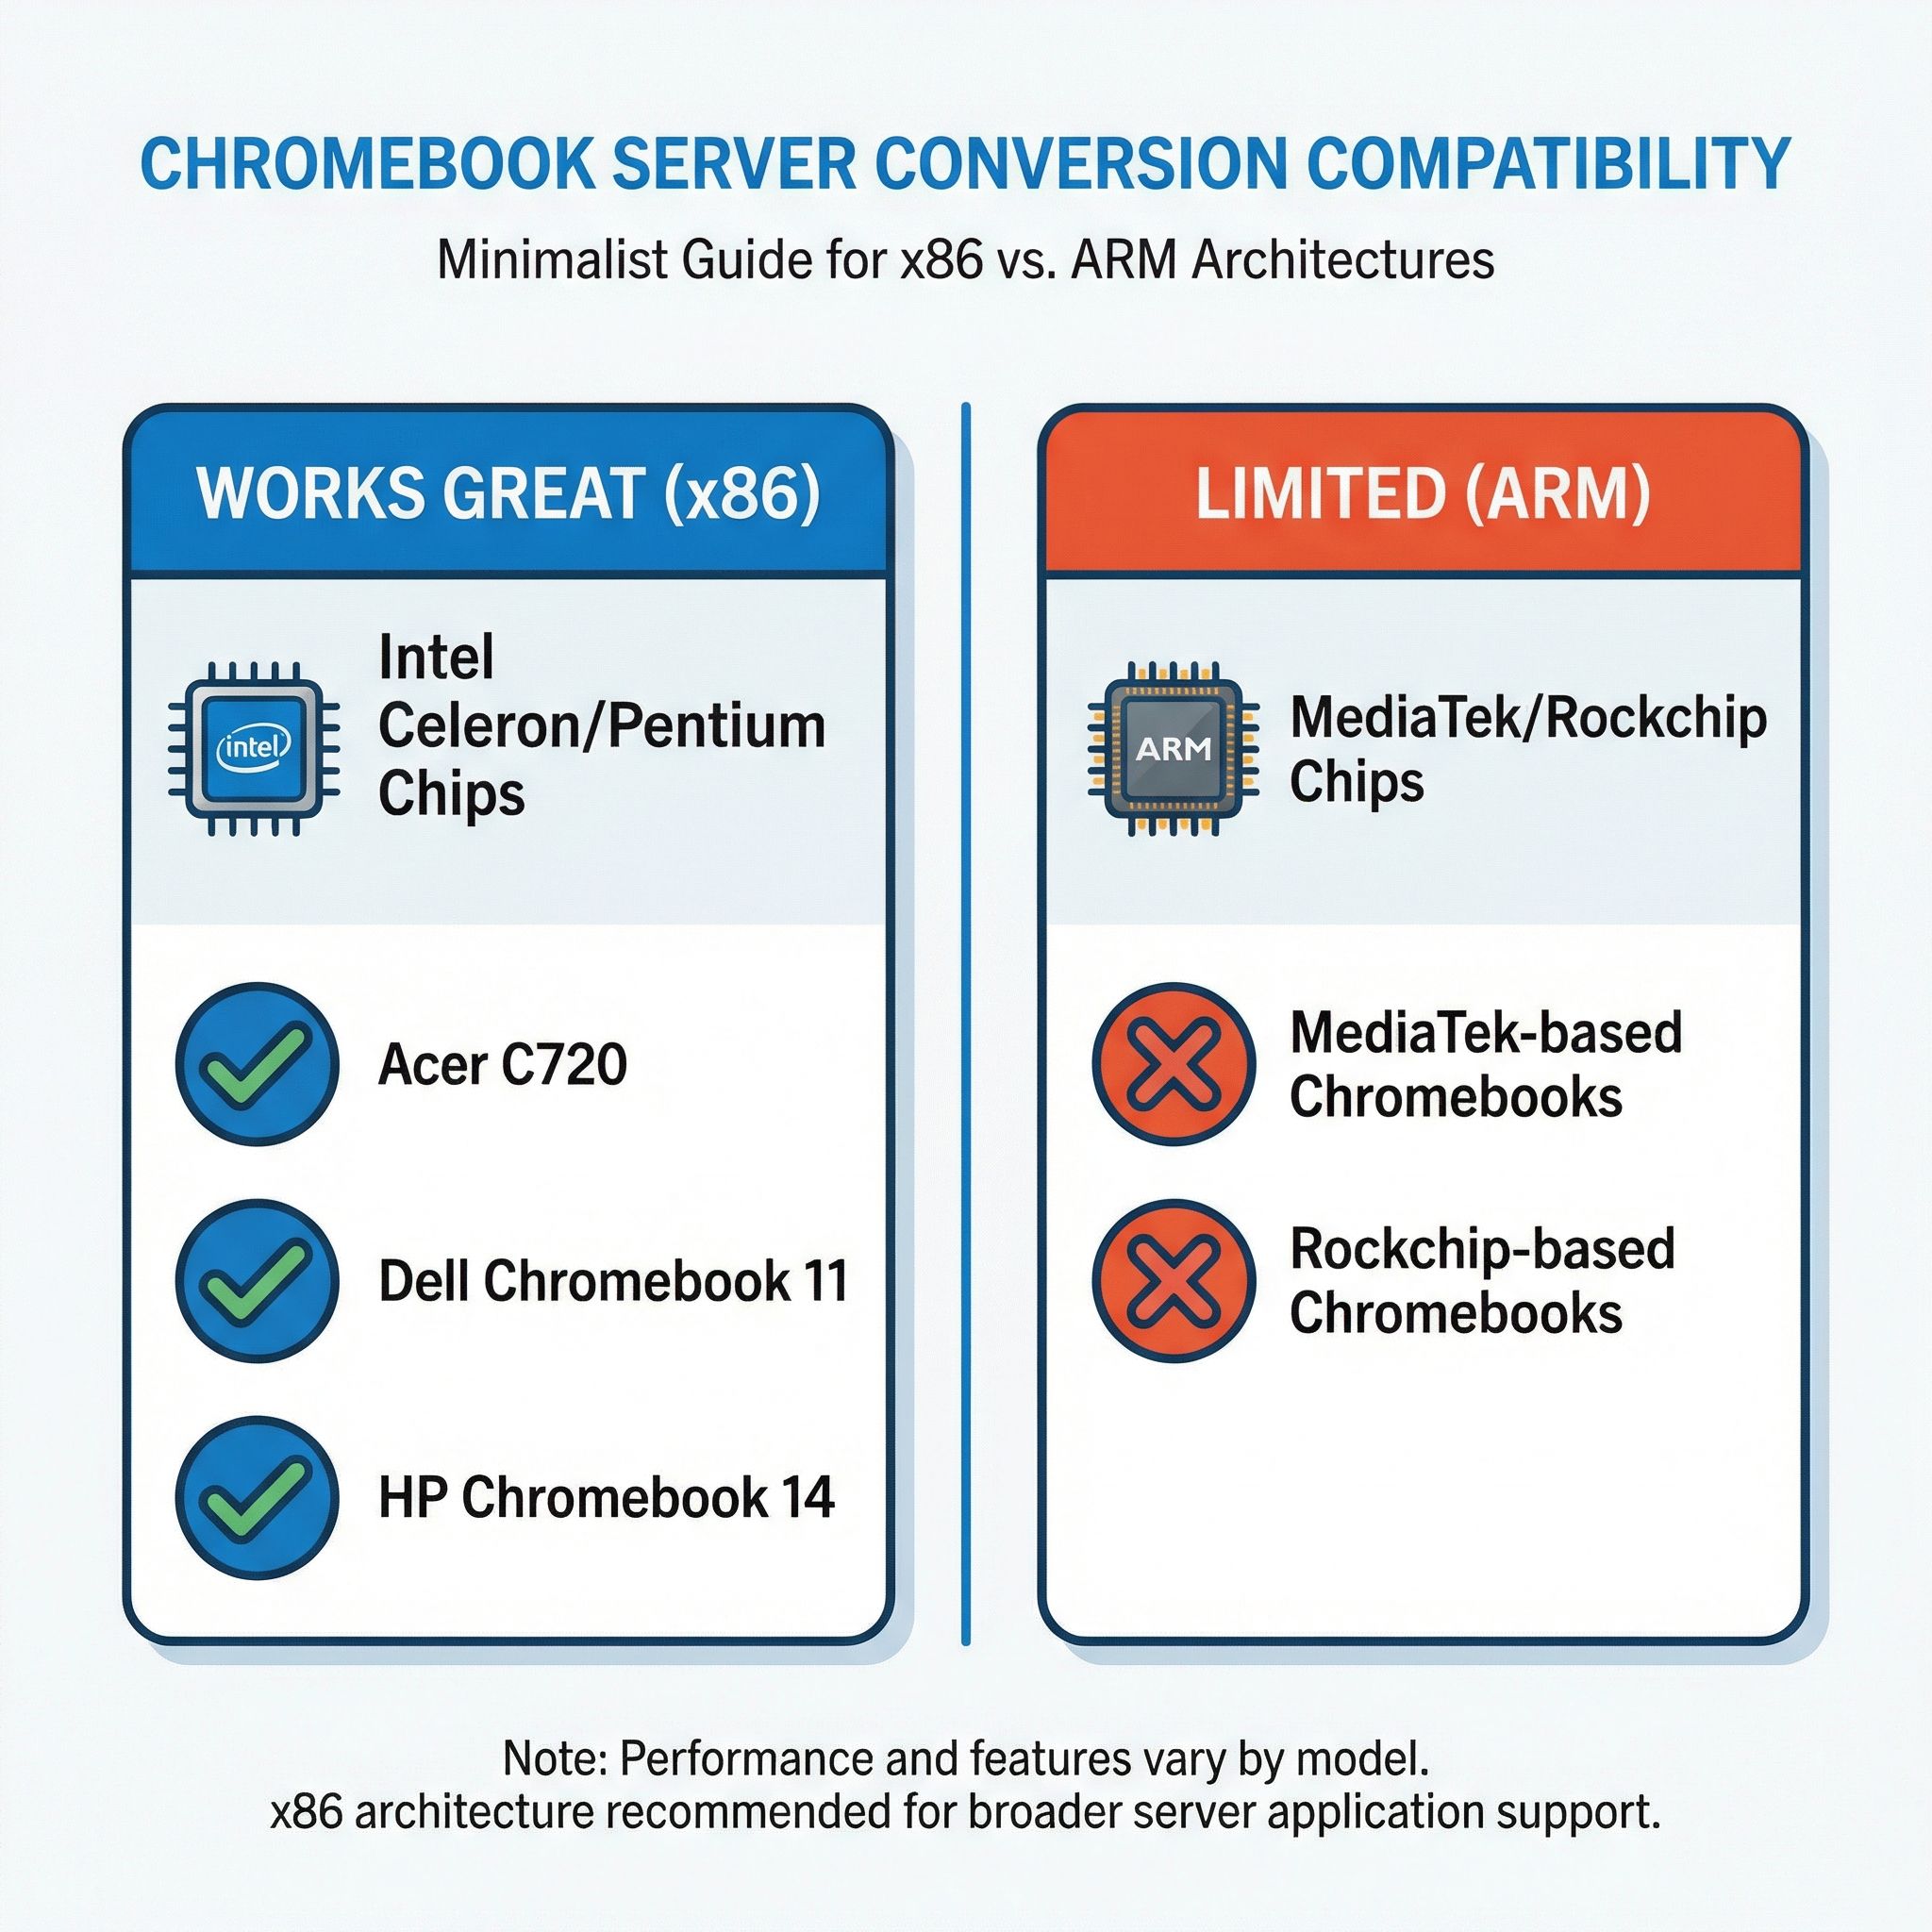
The services that work best on a Chromebook server are the ones that are lightweight by design. Pi-hole is the poster child: it blocks ads and trackers across your entire home network by acting as a DNS sinkhole, and its resource requirements are almost comically low. Pi-hole officially needs just 512MB of RAM and a single CPU core, which means even the most modest Chromebook has resources to spare. A WireGuard VPN endpoint is another natural fit. WireGuard is designed to be lean and fast, using minimal CPU even under load, and running it on a home server lets you tunnel your traffic through your own network when you’re away from home. The WireHole project bundles WireGuard, Pi-hole, and Unbound DNS into a single Docker Compose stack that you can deploy in minutes.
Monitoring dashboards like Grafana paired with Telegraf and InfluxDB work surprisingly well, giving you real-time visibility into your network and server health. Reverse proxies like Nginx Proxy Manager or Traefik let you host multiple web services behind a single IP address with automatic SSL certificates. Personal websites, internal wikis, small Git repositories, RSS aggregators like Miniflux, and bookmark managers like Linkding are all well within a Chromebook server’s capabilities. If you’re exploring the broader world of self-hosting that we covered in our article about the self-hosting renaissance, a Chromebook is a perfectly legitimate place to start.
What Doesn’t Work (And Why)
Honesty matters here, because the internet is full of “you can do anything with an old laptop!” articles that fail to mention the practical limitations. A Chromebook server has real constraints, and pretending otherwise will lead to frustration.
Heavy virtualization is the biggest non-starter. Proxmox, ESXi, or running multiple virtual machines simultaneously requires substantially more RAM and CPU power than most Chromebooks offer. If you need VMs, you need different hardware. ZFS-based storage is also a poor fit because ZFS is memory-hungry by design, and the eMMC storage found in most Chromebooks lacks the endurance for high-write workloads. Large databases like PostgreSQL or MySQL can technically run, but performance will be poor and write amplification on eMMC storage becomes a genuine concern. Media servers like Jellyfin or Plex that need to transcode video will overwhelm the CPU immediately. And using a Chromebook as a router or firewall appliance is impractical because most models only have Wi-Fi networking, with no second network interface for routing traffic.
The eMMC storage deserves special attention because it’s a time bomb that many guides don’t mention. Unlike SSDs, which pair NAND flash with sophisticated multi-channel controllers, DRAM caches, and aggressive wear-leveling algorithms, eMMC storage uses simpler controllers designed for light consumer use: booting ChromeOS, caching web pages, storing a few offline files. Server workloads that generate lots of writes, like Docker container logs, database journals, and system logging, can wear out eMMC significantly faster. The mitigation is straightforward: mount /tmp as tmpfs (storing temporary files in RAM instead of disk), redirect Docker’s data directory to an external USB SSD, configure aggressive log rotation, and avoid running write-heavy services on internal storage. Some higher-end Chromebooks shipped with actual NVMe or SATA SSDs, and those models are considerably better suited for server duty.
The Power Equation

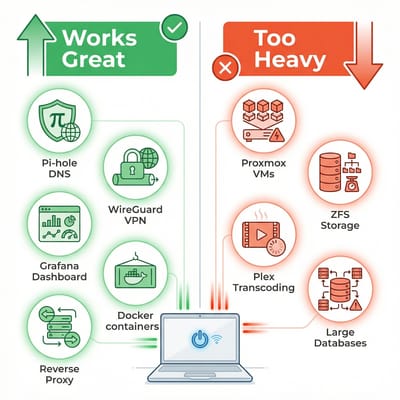
One of the strongest arguments for a Chromebook server is power consumption. These devices were engineered to run all day on a battery, which translates directly into low wall power when plugged in. Running headless with the lid closed and the screen off, a typical Intel Celeron Chromebook idles at roughly 5 to 10 watts. That’s remarkably efficient for an x86 computer with full software compatibility.
For context, here’s how that compares to the alternatives. A Raspberry Pi 4 or 5 idles at around 2.5 to 4 watts depending on the model, which is lower, but it comes with ARM architecture limitations and less RAM in most configurations. An Intel N100 mini PC, the current darling of the homelab community, idles at 6 to 12 watts while offering substantially more power and expandability. A traditional desktop repurposed as a server pulls 30 to 50 watts at idle, which adds up quickly.
Translated into annual electricity costs at the US average of roughly $0.18 per kilowatt-hour, a 7-watt Chromebook server costs about $11 per year to run around the clock. A Raspberry Pi at 3.5 watts costs about $5.50. An N100 mini PC at 10 watts costs about $16. And a traditional server at 40 watts costs about $63. The Chromebook won’t win an efficiency contest against a Raspberry Pi, but it offers full x86 compatibility and more RAM for just a few dollars more per year. And it has one advantage that no Raspberry Pi can match: a built-in battery that acts as an uninterruptible power supply. If your power flickers, your Chromebook server keeps running. That’s worth something when you’re hosting your home’s DNS resolver.
Getting Started: A Weekend Project
The complete process from expired Chromebook to running server can be accomplished in an afternoon. Here’s the high-level path, with links to the detailed guides you’ll need at each step.
Step 1: Identify your Chromebook. Check your model against the MrChromebox supported devices list. Note whether you need to physically open the device to disable write-protect.
Step 2: Enable Developer Mode. This is done through a key combination during boot (typically Esc + Refresh + Power). Be aware that enabling Developer Mode wipes all local data on the Chromebook.
Step 3: Flash UEFI firmware. Open the ChromeOS shell (Ctrl+Alt+T, then type shell), and run the MrChromebox firmware utility script. Select the UEFI Full ROM option. This replaces ChromeOS firmware with standard UEFI, making the device boot like any regular PC.
Step 4: Install Linux. Create a bootable USB drive with Ubuntu Server 24.04 LTS or Debian 12, boot from it, and follow the standard installation. Choose minimal installation options to conserve resources.
Step 5: Install Docker. Follow the official Docker installation guide for your distribution. Then install Docker Compose.
Step 6: Deploy your first services. Start with Pi-hole for network-wide ad blocking, which takes minutes to set up via Docker. The WireHole project bundles Pi-hole, WireGuard VPN, and Unbound DNS resolver into a single docker-compose.yml that deploys your entire stack in one command.
Step 7: Protect your eMMC. Configure /tmp as tmpfs, move Docker’s data directory to an external USB drive if you plan to run more than basic services, and set up log rotation. These steps take minutes and significantly extend the life of your internal storage.
When It’s Time to Graduate
A Chromebook server is a fantastic starting point, but you may eventually outgrow it. Here are the signs that it’s time to consider dedicated hardware.
If you find yourself wanting to run more than a handful of containers simultaneously, if you want media transcoding through Jellyfin or Plex, if you need more than 64GB of reliable fast storage, or if you want to experiment with virtual machines, you’ve hit the Chromebook ceiling. The natural next step is an N100 or N150-based mini PC, which offers dramatically more capability while maintaining the low power consumption that makes always-on servers practical.
Beelink MINI S12
- +Intel N95/N100
- +quiet fanless option
- +2.5Gb Ethernet
- +expandable storage
- -No USB4
- -limited GPU for media tasks
GMKtec G3 Plus
- +Intel N150
- +16GB RAM
- +2.5Gb Ethernet
- +tiny form factor
- -No USB-C video out
- -limited upgrade paths
But don’t rush to upgrade. If your Chromebook handles your current services without performance issues, it’s doing its job. The whole point of this exercise is using what you already have.
The Chromebook as Client (A Plan B)
If your Chromebook turns out to be an ARM model that can’t run MrChromebox firmware, or if it only has 2GB of RAM and struggles with server duties, there’s still a role for it. Install ChromeOS Flex or a lightweight Linux distribution with a desktop environment like XFCE, and use it as a thin client to access services running on other hardware. Kevin Tofel at About Chromebooks documented this approach using a mini PC as the server and a Chromebook as the browser-based interface for Nextcloud, OnlyOffice, PhotoPrism, and even Steam game streaming. Every self-hosted service worth its salt has a web interface, and a Chromebook with a browser is all you need to access it.
This is also a perfectly valid setup for an x86 Chromebook that you’ve decided is too limited for server duty but too functional to throw away. A lightweight Linux desktop with a modern browser turns an expired Chromebook into a perfectly serviceable computer for web browsing, email, document editing, and accessing your home server’s dashboard. The hardware hasn’t changed. Only Google’s willingness to update it has.
The Bigger Picture
There’s something satisfying about taking a device that a trillion-dollar company declared obsolete and making it useful again. It won’t solve the systemic problems with planned obsolescence or the e-waste crisis that continues to grow as millions of pandemic Chromebooks expire. But it’s a small, practical act of resistance against the assumption that software expiration dates should dictate hardware lifespans.
Your Chromebook server won’t win any benchmarks. It won’t replace a proper NAS or a beefy Proxmox host. But it will block ads across your entire network, give you a VPN endpoint for secure browsing on public Wi-Fi, run a monitoring dashboard that makes your homelab feel like mission control, and do it all for about eleven dollars a year in electricity. The device was free. The software is free. The experience of building something useful from something discarded is, frankly, pretty great.


