
Search for “video editing on a Chromebook” and you will find a dozen listicles that name seven apps, give each one a paragraph, and call it a day. They read like product catalogs because that is what they are. Meanwhile, actual Chromebook owners are left wondering whether any of these tools can handle a real editing job: trimming a screen recording for a class presentation, assembling clips from a family trip, cutting a short video for Instagram. I wrote 5 Things Chromebooks Can’t Do at the start of 2026 and listed video editing among the limitations. That was accurate at the time. It is no longer the whole story.
Google Vids went free for all Google accounts in February 2026, bringing teleprompter, transcript trimming, and styled captions to anyone with a browser. A new Screen Recorder Chrome extension captures up to 30 minutes at no cost. And browser-based editors like CapCut have matured to the point where the web version on a Chromebook handles short-form social work as smoothly as the dedicated mobile app does on a phone. The landscape has shifted enough that the question is no longer whether you can edit video on a Chromebook. It is which tool works best for the job you actually need done.
What Changed in 2026
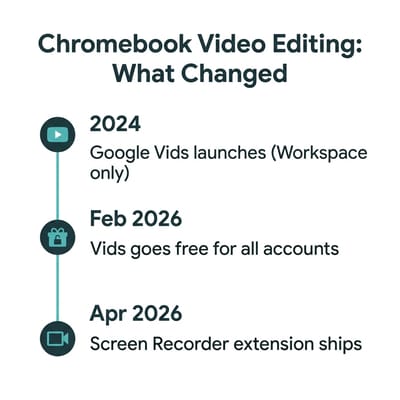
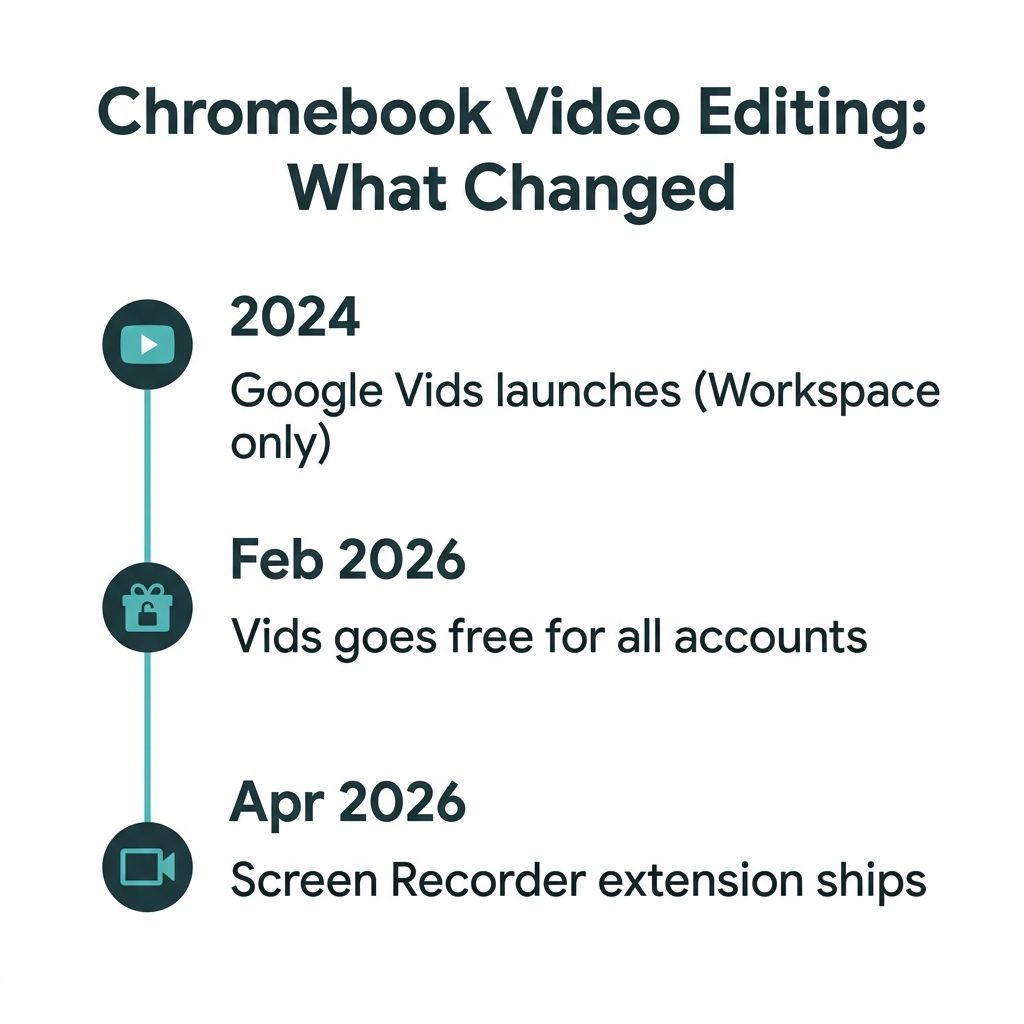
Three things converged to make video editing on Chrome OS genuinely practical. First, Google Vids expanded its free tier. The tool launched in late 2024 as a Workspace-only product, but Google opened it to all accounts in early 2026 and moved three previously paid features (read-along teleprompter, transcript trim, and styled captions) into the free plan. Second, the Screen Recorder Chrome extension shipped in April 2026, giving every Chrome user a built-in way to capture their screen for up to 30 minutes without installing anything. Third, browser-based editors reached a tipping point. CapCut’s web editor added multi-track timelines, transitions, and export options that put it on par with apps that used to require a download.
Hardware caught up too. The Chromebook Plus specification, which requires 8 GB of RAM and a capable processor as a baseline, is now the standard for mid-range Chromebooks. That extra memory makes a real difference when you are running a browser-based editor with multiple tabs open. Two years ago, editing video on a 4 GB Chromebook meant constant tab crashes and glacial exports. Today, an 8 GB machine handles 1080p timelines without breaking a sweat.
Google Vids: Know What You Are Getting
Here is where the reality matters more than the hype. Google Vids is not a traditional video editor. It is a scene-based creation tool, closer to Google Slides than to Premiere Pro. You build a video by arranging scenes on a storyboard, adding media to each scene, and letting Vids handle transitions between them. There is no multi-track timeline, no color correction panel, no keyframe animation. Projects can run up to 30 minutes, a limit Google expanded from 10 minutes in March 2026.
That sounds limiting because it is. But within its lane, Vids does several things remarkably well. The transcript trim feature lets you edit video the way you edit a document: highlight a sentence in the transcript, delete it, and the video cuts itself to match. For anyone who has recorded a screen walkthrough and needs to trim dead air or a false start, this is faster than scrubbing a timeline frame by frame. The read-along teleprompter scrolls your script on screen while you record, which means fewer takes and less editing afterward. Styled captions generate social-media-ready subtitles synced to your audio automatically.
The AI features deserve a measured take. Veo 3.1 gives free accounts 10 AI-generated video clips per month, each up to 8 seconds at 720p resolution. That is enough to drop a stock-style establishing shot into a presentation, not enough to build a video from scratch. The AI music generator, Lyria 3, and the AI avatar feature both require a paid Google AI Pro or Ultra subscription. Free-tier users get the editing tools; they do not get the generative AI playground.
Where Google Vids genuinely shines is the workflow it was designed for: turning a screen recording or a slide deck into a polished short video with captions and voiceover. A teacher recording a 5-minute lesson walkthrough, a student narrating a presentation, a small business owner making a product demo: these are the use cases where Vids earns its place. For anything involving a traditional multi-clip timeline, you need a different tool.
The Tools That Handle Real Editing
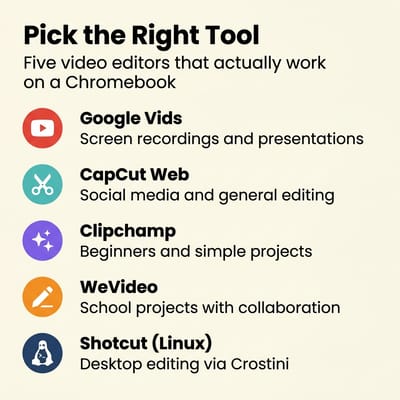

CapCut (Web) is the standout performer for actual video editing on a Chromebook. The browser-based version runs without any installation, which means it works on every Chromebook with a modern browser, with no Android app compatibility required. It offers a full multi-track timeline, transitions, text overlays, filters, speed controls, and auto-caption generation. The font library and effects catalog rival some desktop editors. Because it syncs with CapCut’s mobile app, you can start an edit on your phone and finish it on your Chromebook. The free tier is watermark-free for basic edits with free assets, though Pro-tagged templates and effects add a watermark unless you subscribe. For short-form social media content (TikTok, Instagram Reels, YouTube Shorts), CapCut’s web editor is hard to beat on any platform, let alone Chrome OS.
Clipchamp brings Microsoft’s approach to browser-based editing. The drag-and-drop interface is deliberately simple, making it a strong choice for beginners or anyone who finds timeline editors intimidating. It includes templates, stock media, and basic text and transition tools. The free tier exports at 1080p without a watermark, which gives it an edge over most competitors. If you are a parent helping a child put together their first video project and you want something that will not overwhelm them, Clipchamp is the gentlest on-ramp.
WeVideo has carved out a specific niche in education. It offers collaboration features that let multiple students work on the same project, teacher dashboards for monitoring progress, and curriculum-aligned templates. The free tier is tight (5 minutes of export time per month at 480p), but many schools purchase classroom licenses. If your child’s school already uses WeVideo, it is the path of least friction.
KineMaster runs as an Android app on Chromebooks that support the Play Store. It offers multi-layer timelines, chroma key (green screen), and precise audio controls that the web-based editors cannot match. Apps like this should run even better on the next-generation platform, where the native Android app transition retires the compatibility layer they currently run through. The catch is that it was built for phone screens. On a Chromebook, the touch-oriented interface feels awkward with a trackpad, and you may find yourself reaching for the screen more than you expected. If your Chromebook has a touchscreen, KineMaster becomes a much better proposition.
If you have turned on Chrome OS’s Linux development environment from Settings, three open-source editors are worth knowing. Kdenlive is the most resilient pick in 2026: its proxy workflow generates lower-resolution copies for the timeline, so playback does not have to chew through 4K source footage, and its MLT engine handles ChromeOS’s Linux memory pressure better than the alternatives. The catch is that long sessions accumulate memory and the app needs an occasional restart. Shotcut runs the smoothest of the three on Chromebook hardware but has a less conventional interface and fewer effects out of the box. OpenShot is the friendliest for first-time editors, and its official download page documents the AppImage install path for ChromeOS users, though its feature set is the lightest. All three install through sudo apt install inside the Linux environment, or through Flatpak from Flathub. Plan on at least 8 GB of system RAM and at least 12 GB allocated to the Linux disk in Settings; the default allocation is small and video footage will fill it fast.
What does not work, despite what every Chromebook listicle keeps repeating, is DaVinci Resolve. Blackmagic only officially supports Rocky Linux 8.6 (the open-source successor to CentOS) as a desktop target, and ChromeOS’s Linux environment is Debian-based. That mismatch means Resolve cannot find the libraries it expects (the missing libssl.so.10 is the error most Chromebook owners hit), and on top of that, ChromeOS does not expose the GPU acceleration Resolve needs for its rendering and color pipelines. Even on a high-end Chromebook with 16 GB of RAM, Resolve either crashes before the splash screen or runs at a few frames per second once it does start. If you genuinely need Resolve, the practical answer is to remote into a desktop workstation through Chrome Remote Desktop, Parsec, or a cloud rendering service rather than installing it locally.
Three Common Workflows
Rather than listing features, here is what each of three common workflows looks like in practice on a Chromebook.
Screen Recording for a Class Presentation
The Google Vids Screen Recorder extension captures your screen in one click from the Chrome toolbar. Record your slides, narrate over them, and the recording feeds directly into Google Vids for editing. Use transcript trim to cut the section where you fumbled a sentence, add styled captions for accessibility, and export. The bottleneck for a short presentation is your script, not the editor: most of the work is recording, and Vids handles the trimming and captions in passes that take seconds. This is the workflow where Google Vids earns its keep, and it is entirely free.
Assembling Clips from a Family Trip
You have a dozen short clips from your phone, uploaded to Google Drive or plugged in via USB. Open CapCut’s web editor, import the clips, arrange them on the timeline, add transitions between scenes, drop in a music track from CapCut’s royalty-free library, and export. CapCut runs in the browser, so any modern Chromebook can do this, but 8 GB of RAM is the difference between a smooth real-time preview and one that stutters when you scrub or apply a transition. The workflow itself feels natural if you have ever used iMovie or any basic desktop editor. On a 4 GB Chromebook, expect longer export times and the occasional tab reload, but the job still finishes.
Cutting a Social Media Clip
You want a 30-second vertical video for Instagram with text overlays and captions. CapCut’s web editor has preset aspect ratios for every social platform, auto-caption generation, and a template library that handles the visual polish. Select a 9:16 canvas, trim your clip, add auto-generated captions, choose a font style, and export. The result looks professional enough that you would not know it was made on a Chromebook. This is where CapCut’s design DNA (built for short-form content) shows its strength.
Does Your Chromebook Have Enough Hardware?
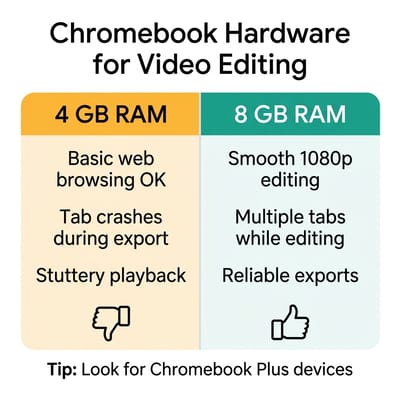
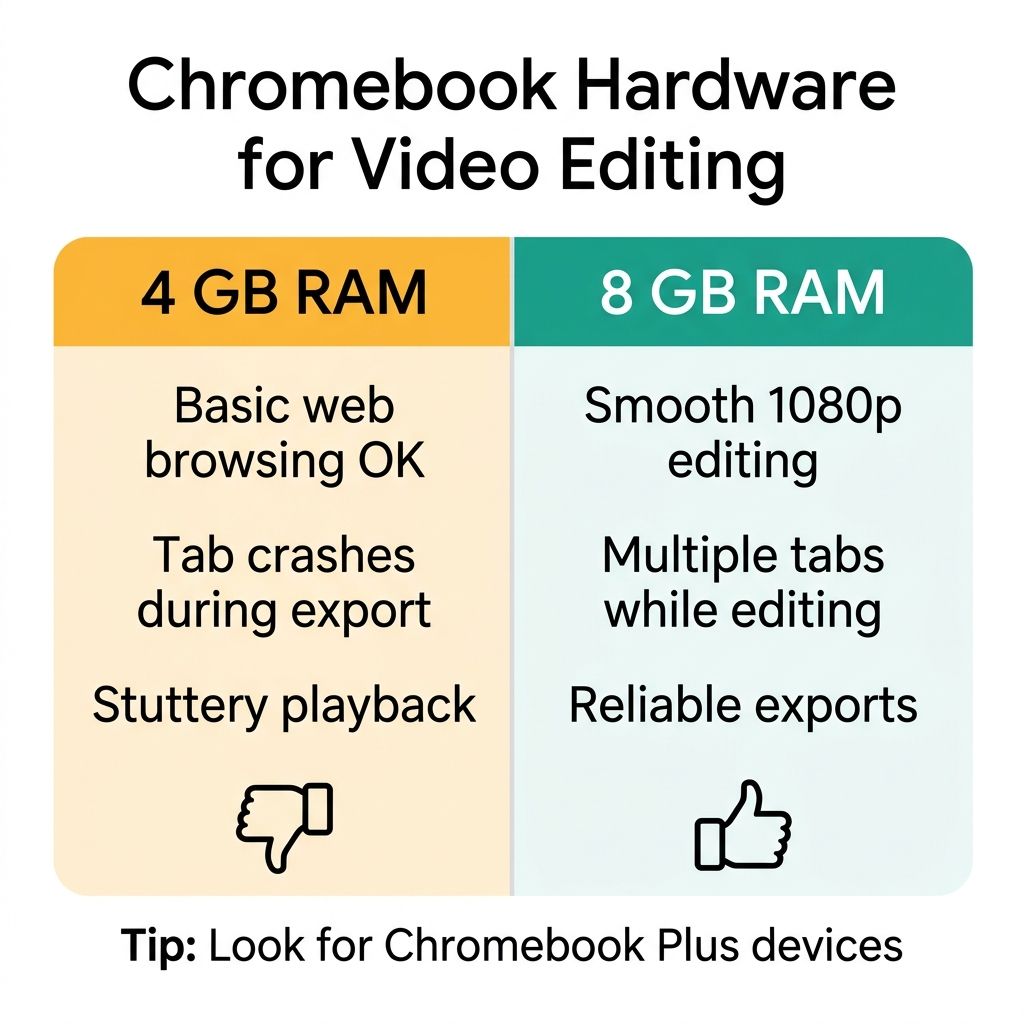
The answer depends on which tools you plan to use and how complex your projects are. Web-based editors like Google Vids and CapCut run in the browser, so they work on any Chromebook that can run Chrome, but they work noticeably better on machines with 8 GB of RAM. The difference is not subtle. On a 4 GB machine, a CapCut timeline with four clips and a music track triggers Chrome’s memory management, leading to stuttery playback and the occasional “Aw, Snap!” tab crash during export. On an 8 GB Chromebook Plus with an Intel Core i3 or AMD Ryzen 3 processor, the same project plays back smoothly and exports without drama.
Android apps like KineMaster run inside ChromeOS’s Android subsystem, which adds overhead. They need at least 8 GB to perform reliably. Linux-native editors like Shotcut and Kdenlive run inside the Linux development environment and benefit from the same 8 GB threshold, plus enough free disk space inside the Linux allocation itself; ChromeOS ships with a small default Linux disk size that you can expand from Settings.
Storage is the other bottleneck that nobody talks about. Most Chromebooks ship with 64 to 128 GB of internal storage, and video files eat that up fast. A 5-minute 1080p clip runs about 300 to 500 MB depending on the codec. If you are working with a dozen clips, you can burn through half your storage before you start editing. The practical solution is to work from Google Drive or an external USB drive, and to export finished videos directly to the cloud rather than storing them locally. If you are shopping for a Chromebook with video editing in mind, look at our best Chromebooks under $300 list for entry-level options, or the three Chromebook Plus models below for machines built to handle real timelines.
Three Chromebooks Built For This
Any Chromebook Plus will run the browser-based editors, but a few stand out for video work specifically: a high-resolution screen for the timeline, a color-accurate panel for previews, and enough processor headroom that exports do not turn into coffee breaks.
Acer Chromebook Plus 516 GE
Lenovo Chromebook Plus 14" OLED
If you are weighing an OLED panel for daily editing, it is worth reading our take on the OLED Chromebook longevity question before you commit, since burn-in behaves differently with static editing UI on screen all day.
Acer Chromebook Plus Spin 714
For a side-by-side look at all the Chromebook Plus models that handle these workflows, see our Chromebook Comparison Chart to sort by RAM, screen size, and processor.
Picking the Right Tool
The worst advice is “use Google Vids for everything” or “just download KineMaster.” Each tool has a sweet spot, and using the right one for your task is the difference between a smooth experience and a frustrating one.
For narrated screen recordings and presentations: Google Vids. The transcript trim and teleprompter features are purpose-built for this, and the Screen Recorder extension removes the need for any third-party capture tool.
For multi-clip editing, social media, and general-purpose video work: CapCut’s web editor. It is the closest thing to iMovie that runs in a browser, with enough depth for YouTube-quality content and enough simplicity for a first-time editor.
For school projects with collaboration: WeVideo if your school has a license, Clipchamp if they do not.
For desktop-style editing in Linux: Shotcut is the safest install in ChromeOS’s Linux environment, with OpenShot and Kdenlive as alternatives. None of them substitute for a dedicated workstation, but they cover projects that outgrow the browser editors.
For DaVinci Resolve specifically: do not try to install it on the Chromebook. Blackmagic only officially supports Rocky Linux 8.6 and proper GPU drivers, neither of which ChromeOS’s Linux environment provides. If you need Resolve, remote into a real workstation through Chrome Remote Desktop or a cloud machine instead.
The broader point is that video editing on a Chromebook is no longer a question of whether it is possible. It is a question of matching the tool to the task. Google Vids handles the presentation-to-video pipeline better than anything else on any platform. CapCut matches the casual editing experience that Mac users get from iMovie. Linux-native editors like Shotcut cover desktop-style projects through ChromeOS’s Linux environment, and the things Chromebooks genuinely cannot do, such as DaVinci Resolve and GPU-accelerated color grading, are best handled by remoting into a real workstation rather than fighting the OS.
The narrative that Chromebooks are just browsers has always been reductive. But for video editing specifically, the gap between Chrome OS and traditional operating systems narrowed sharply in 2026. If you already own a Chromebook with 8 GB of RAM, you have a capable video editing machine. You just need to know which tool to open.


