
container is Apple’s free, open source command line tool for running Linux containers on a Mac. It uses standard OCI images, so images from Docker Hub and other registries run as they are.
Docker Desktop puts all your containers in one shared Linux VM. Apple’s tool boots a lightweight VM for every container, each with its own kernel and its own IP address on your Mac. The same tool also runs a persistent Linux system with systemd, which Apple calls a container machine, and a local Kubernetes cluster.
The steps below are for container 1.6.1, released October 23, 2026, on a Mac mini with an M4 chip and macOS 27.2. Everything runs from Terminal; there is no app window. The tool is licensed under Apache 2.0.
What you need
You need a Mac with Apple silicon (M1 or later) on macOS 26 Tahoe or later. Apple does not support older macOS versions. You also need Homebrew for the install route below, and about 5 GB of free disk space for the kernel, images, and cluster in this guide.
To run x86-64 Linux images, the Mac needs Rosetta. If you have never installed it, run softwareupdate --install-rosetta. Rosetta also matters for image builds; see Troubleshooting if a build fails without it.
Install container and start it
Homebrew has a container formula. Install it, then start the service; neither step asks for a password:
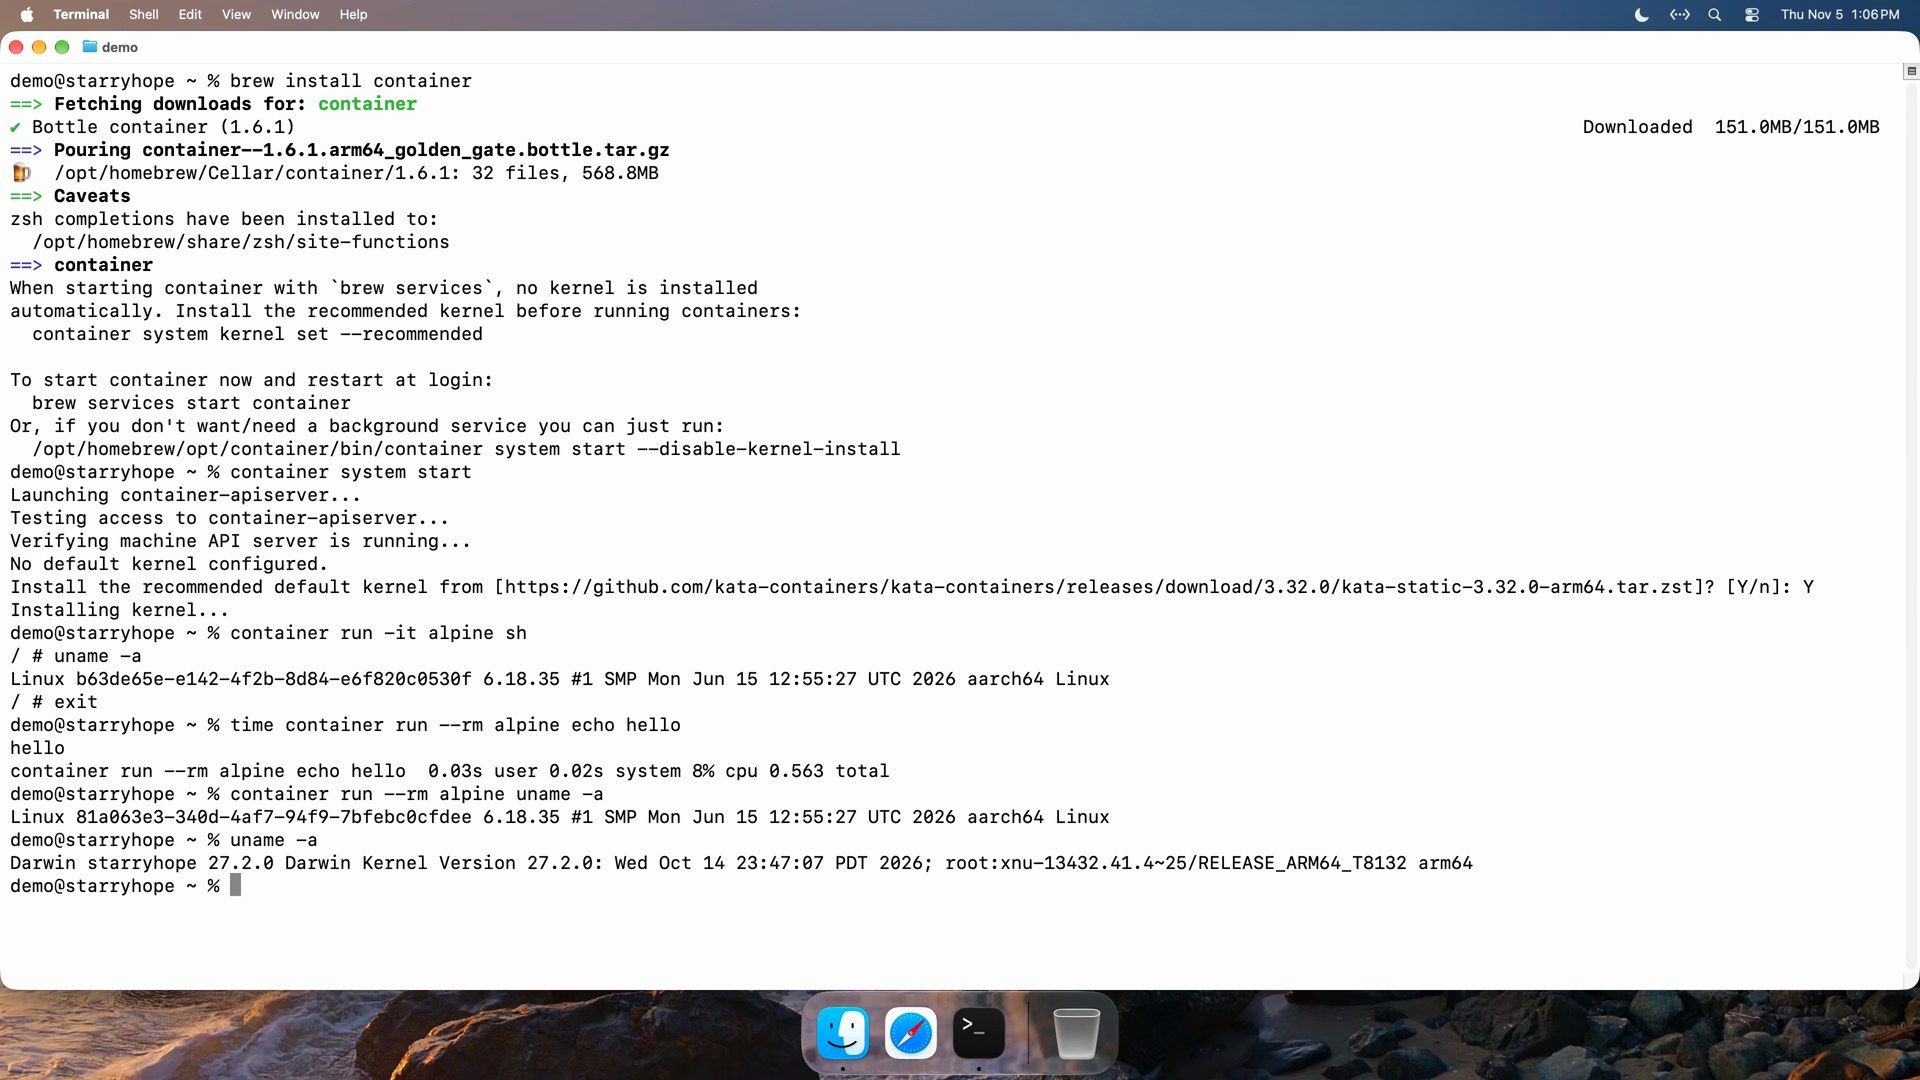
brew install container
container system start
container system start launches the background service. The first time, it offers to download a recommended Linux kernel, a build from the Kata Containers project:
No default kernel configured.
Install the recommended default kernel from [https://github.com/kata-containers/kata-containers/releases/download/3.32.0/kata-static-3.32.0-arm64.tar.zst]? [Y/n]:
Type Y. The download is 664 MB, and every container VM boots this kernel.
Apple’s own route is the signed installer package, container-1.6.1-installer-signed.pkg, on the GitHub releases page. It installs under /usr/local and asks for your admin password. The Homebrew formula is maintained by Homebrew, not by Apple; both install the same version 1.6.1. Use one route, not both.
Open a Linux shell
An interactive run of Alpine drops you into a shell in its own VM:
container run -it alpine shThe prompt changes to / #. Inside, uname -a reports a Linux kernel on aarch64, 64-bit Arm. Type exit to leave; the container stops.
One VM per container sounds slow to start. With the image cached, a container that runs one command and exits takes about half a second:
time container run --rm alpine echo hello
container run --rm alpine uname -a
uname -a
The first run, with the image pull, took about 4.5 seconds. After that, the whole start, run, and stop took 0.563 seconds on the M4 Mac mini. container run --rm alpine uname -a prints Linux, and uname -a on the Mac prints Darwin.
For images that only ship for x86-64, --arch amd64 pulls that variant, and Rosetta runs it:
container run --rm --arch amd64 alpine uname -mIt prints x86_64.
Reach a container by its IP address
Every container gets its own IP address, and the Mac can reach it directly. Start nginx in the background and list the running containers:
container run -d --name hello nginx
container ls
The IP column shows an address such as 192.168.64.2/24. Open it in Safari, using your own address:
open http://192.168.64.2The nginx welcome page loads straight from the container’s IP, with no -p flag. Remove the test container when you are done:
container rm -f helloPublishing a port to localhost with -p works too (-p 8080:80). The first time a container publishes a port, macOS asks whether container-runtime-linux may find devices on your local network. Click Allow, or published ports reset every connection.
Reach containers by DNS name
IPs change when you recreate a container, so names are easier to work with. The tool runs its own DNS server. Set test as its domain in the config file, and restart the service:
mkdir -p ~/.config/container
printf '[dns]\ndomain = "test"\n' > ~/.config/container/config.toml
container system stop
container system start
container system stop stops every running container, so do this before you start the app below. Then add a macOS resolver for .test. This writes a file to /etc/resolver/, so it asks for your admin password:
sudo container system dns create testFrom then on, a container named web answers at web.test, from Safari on the Mac and from other containers. Type http:// in front of the names in Safari: a bare web.test in the address bar goes to a search engine instead. .test is a reserved top-level domain, so it does not clash with real sites.
Run a three-container app
Apple publishes samples in a separate repository, container-examples. Its container-cluster-gateway folder holds a Shared Notepad with three services: a React front end served by nginx, a Flask API, and Valkey for storage. Clone it into your home folder and build the API and front end images from source:
cd ~
git clone https://github.com/apple/container-examples
cd container-examples/container-cluster-gateway
container build -t demo-api:latest api
container build -t demo-web:latest web
container builder stop
The builds run in a builder VM of their own, buildkit, and the results are regular OCI images. The builder uses up to 2 GB of memory while it runs; container builder stop shuts it down when the builds are done.
Valkey runs from its Docker Hub image, with a named volume for its data. Start the API before the front end, because nginx in the front end exits at once if it cannot resolve api.test:
container volume create notes-data
container run -d --name valkey -v notes-data:/data valkey/valkey:8 valkey-server --appendonly yes
container run -d --name api -e VALKEY_HOST=valkey.test demo-api:latest
container run -d --name web demo-web:latest
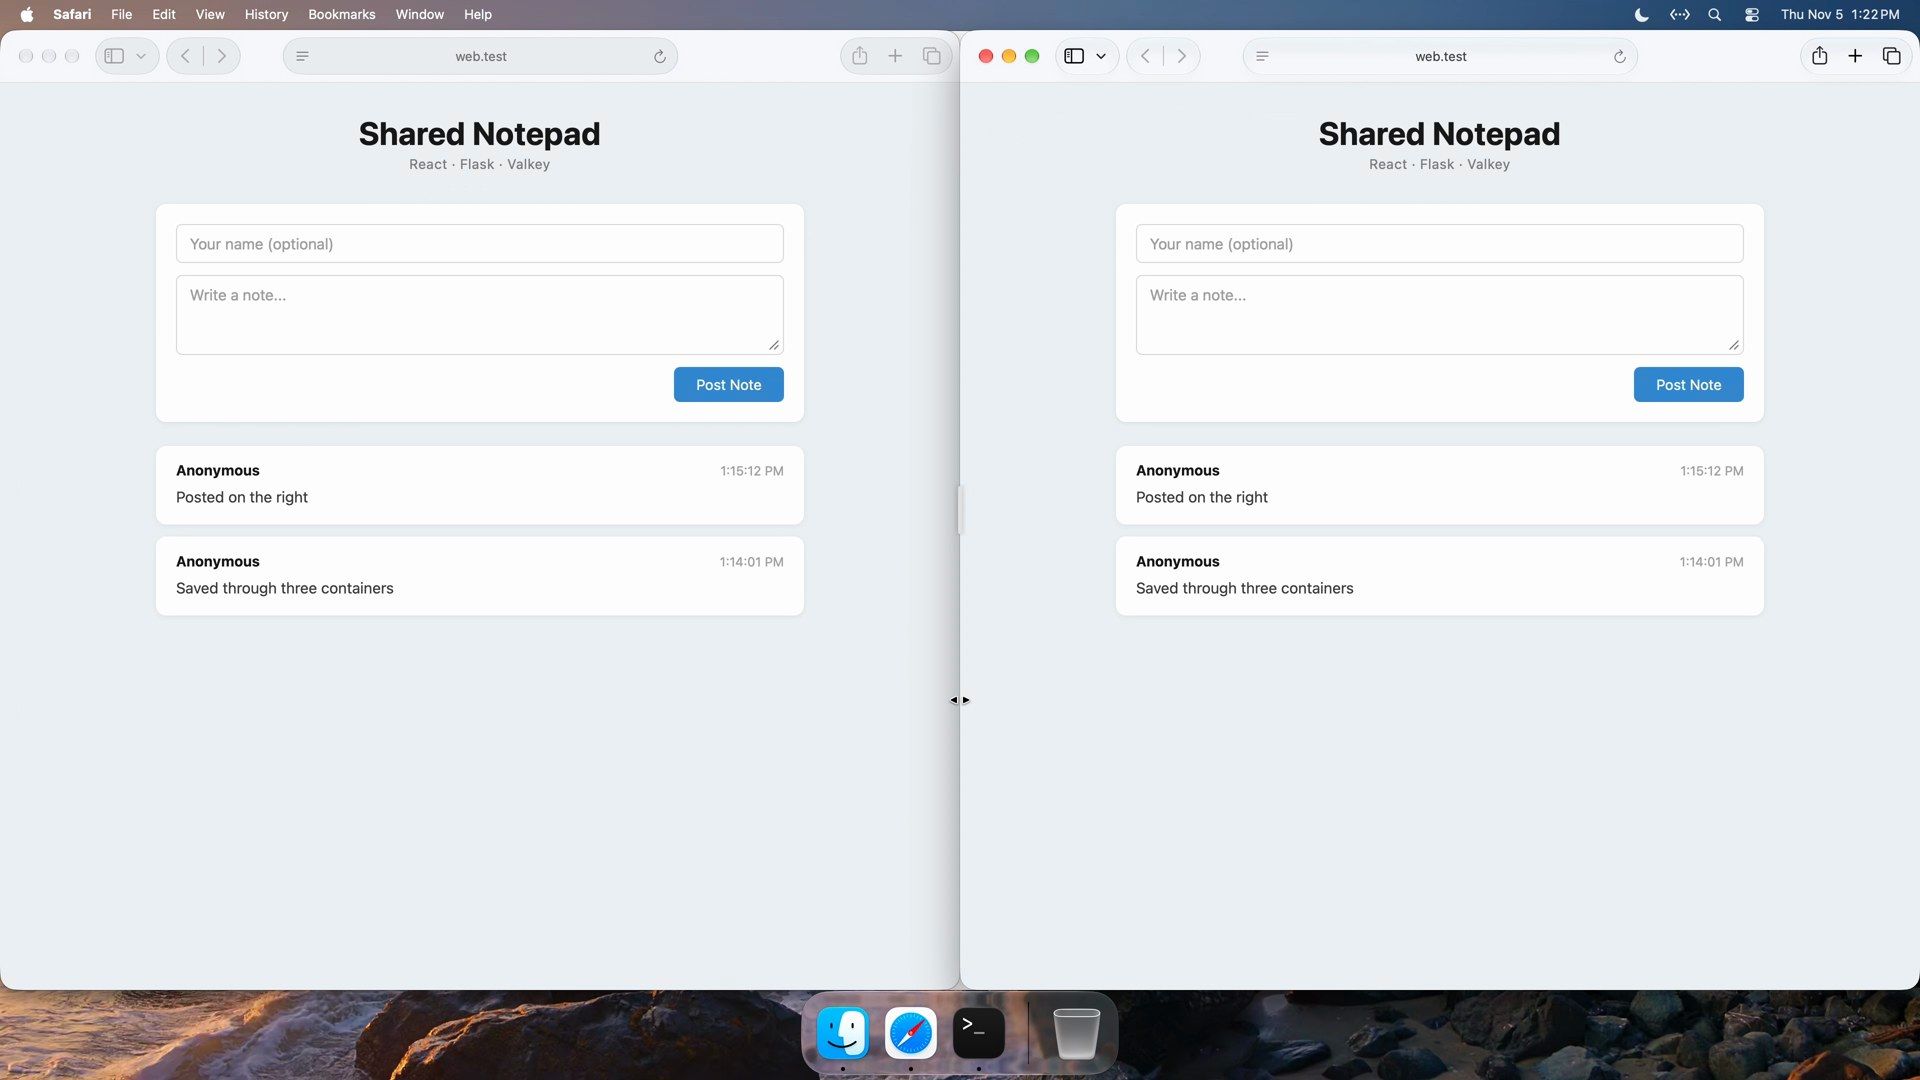
open http://web.test
Nothing in the setup uses an IP. The API finds the database at valkey.test, and nginx in the front end proxies to api.test. --appendonly yes makes Valkey write each note to disk in the volume.
Type a note and click Post Note; it goes through all three containers. Open http://web.test in a second Safari window, and a note posted in one window shows up in the other within a few seconds, because the front end polls the API.
Check memory use with container stats
container stats shows what a VM per container costs in memory:
container statsIt lists each container’s CPU, memory, network, and disk use, and refreshes like top. Press ctrl c to leave it, or add --no-stream for one snapshot. With the notepad running, the front end used about 16 MiB, the API about 60 MiB, and Valkey about 35 MiB. Each container gets a 1 GiB memory limit and 4 CPUs by default, which you can change with --memory and --cpus on container run.
Replace the database and keep the notes
To test the volume, delete the Valkey container and start a new one on the same volume:
container ls
container rm -f valkey
container run -d --name valkey -v notes-data:/data valkey/valkey:8 valkey-server --appendonly yes
container ls
The second container ls shows the new Valkey at a different IP. Wait about a minute: the API takes that long to reconnect to the new database by name. Then reload the page in Safari, and the notes are still there. The app keeps working on the new IP because it connects to valkey.test. A reload right after the swap can show “No notes yet” for a moment; the notes are safe in the volume.
Run an Ubuntu machine with systemd
A regular container runs one program: its first process is your own command, with no systemd to manage services. container machine runs a whole Linux system instead. It boots the image’s own init, stays up after you leave its shell, and keeps its changes across restarts. Your Mac’s home folder is mounted inside at the same path, read and write, so you can run Linux services under systemd next to the code you edit on the Mac. It is much like WSL on Windows. Apple’s container machine documentation has the details.
A machine needs an image with an init at /sbin/init. Stock ubuntu:24.04 from Docker Hub is built for containers and leaves out systemd, so container machine create ubuntu:24.04 fails with /sbin/init: not found. Apple’s documentation gives a Dockerfile, built on the same Ubuntu image, that installs systemd, D-Bus, sudo, and an SSH server. Save it as Dockerfile in an empty folder under your home folder, for example ~/projects:
FROM ubuntu:24.04

ENV container container

RUN apt-get update && \
    apt-get install -y \
    dbus systemd openssh-server net-tools iproute2 iputils-ping curl wget vim-tiny man sudo && \
    apt-get clean && \
    rm -rf /var/lib/apt/lists/* && \
    yes | unminimize

RUN >/etc/machine-id
RUN >/var/lib/dbus/machine-id

RUN systemctl set-default multi-user.target
RUN systemctl mask \
      dev-hugepages.mount \
      sys-fs-fuse-connections.mount \
      systemd-update-utmp.service \
      systemd-tmpfiles-setup.service \
      console-getty.service
RUN systemctl disable \
      networkd-dispatcher.service

RUN sed -i -e 's/^AcceptEnv LANG LC_\*$/#AcceptEnv LANG LC_*/' /etc/ssh/sshd_config
Build it like any other image, turn it into a machine named ubuntu, and open a shell in it:
cd ~/projects
container build -t local/ubuntu-machine:latest .
container machine create local/ubuntu-machine:latest --name ubuntu
container machine run -n ubuntu
The prompt reads you@ubuntu:/Users/you/projects$, with your Mac user name: the shell opens in the same folder you ran it from on the Mac. The Linux ~ is a separate folder, /home/you, so use the full /Users/you/... path for Mac files. A machine gets half of the Mac’s memory by default.
Check that systemd is up:
systemctl is-system-runningIt prints running, and sudo asks for no password. The image ships without package lists, so apt update comes first. Then install nginx and start it as a service:
sudo apt update
sudo apt install -y nginx
sudo systemctl enable --now nginx
systemctl is-active nginx
The install alone leaves nginx enabled but stopped: it prints policy-rc.d denied execution of start, because the Ubuntu container image blocks service starts during package installs. systemctl enable --now nginx starts it, and systemctl is-active nginx prints active.
A file you write in the machine is a file on your Mac, since it is the same folder. Write one, leave the machine, and read it from macOS:
echo 'written from Ubuntu' > from-linux.txt
exit
cat from-linux.txt
Leaving the shell does not stop the machine. Stop it and start it again. Wait about five seconds after the shell opens before you check the service, so systemd is ready; right away, systemctl can print Failed to connect to bus.
container machine stop ubuntu
container machine run -n ubuntu
systemctl is-active nginx
nginx is active again. container machine rm ubuntu deletes the machine and its storage.
The first time something in a machine writes to a protected folder such as your Mac’s Desktop, macOS asks whether container-runtime-linux may access that folder. A plain folder such as ~/projects raised no prompt.
A machine is far less isolated than a container
Apple’s documentation says to create machines only from images you trust. A machine mounts your whole Mac home folder read-write, forwards your SSH agent so programs inside can use your SSH keys, runs with all Linux capabilities, and gives your account sudo with no password. Anything that runs as root inside can change any file in your home folder that your Mac account can change. container machine set -n ubuntu home-mount=ro makes the home folder read-only, and home-mount=none leaves it out; stop and start the machine to apply it.
Start a local Kubernetes cluster
container cluster builds a local Kubernetes cluster in which every node is a VM of its own. It is marked experimental in Apple’s command reference, so its options may change in a later release.
The cluster nodes run Kubernetes 1.35.5, and kubectl is supported within one minor version of the cluster, so install the 1.35 package rather than the newest one (1.37.2):
brew install kubernetes-cli@1.35Homebrew marks this versioned formula as deprecated and plans to disable it on February 28, 2027.
Create the cluster, use it, and delete it in one sitting, and keep the Mac awake. A stopped cluster can’t be started again in 1.6.1: an open issue reports the Kubernetes API server failing after a node restart (#2410). Create a fresh one each session instead.
Go back to the container-cluster-gateway folder and create a cluster with a control plane and two worker nodes:
cd ~/container-examples/container-cluster-gateway
container cluster create --workers 2 --memory 2g --cpus 2
container cluster list
kubectl get nodes
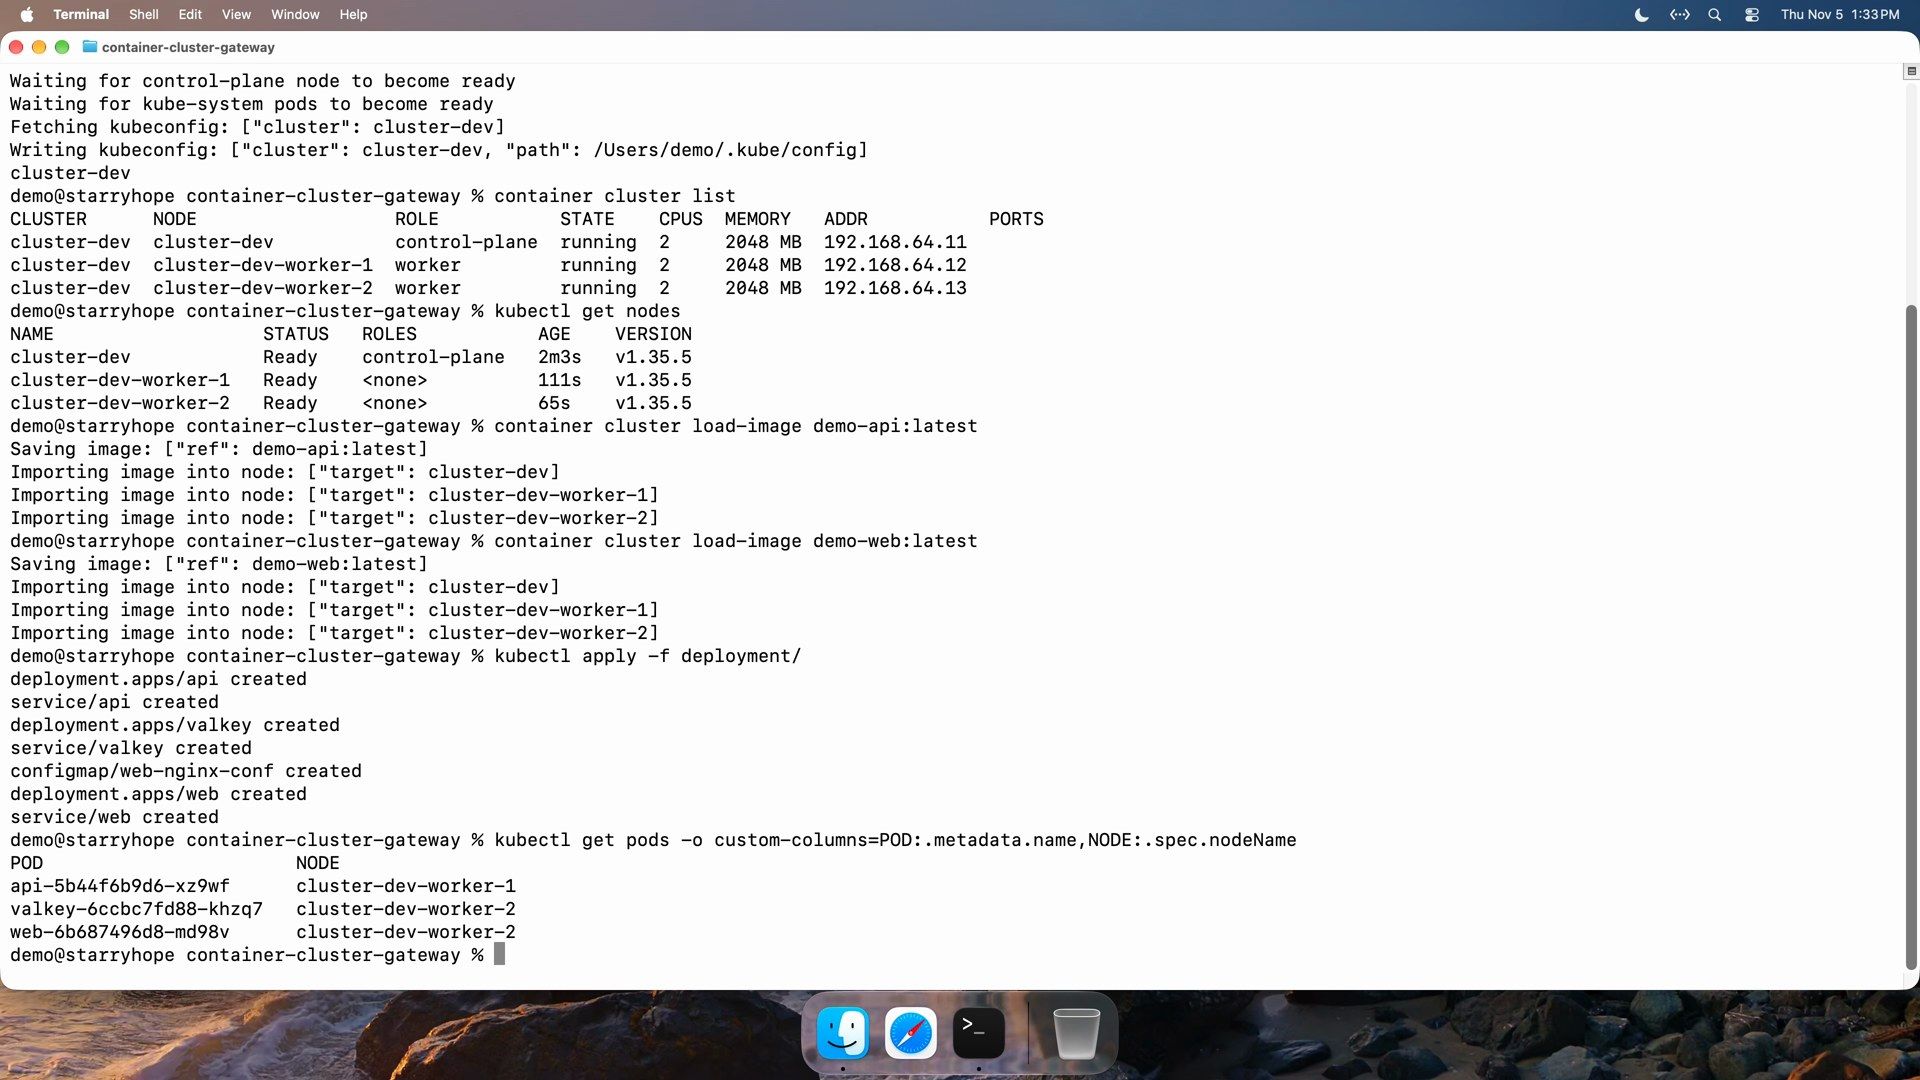
The first create pulls the node image and took about two minutes here. container cluster list shows cluster-dev, cluster-dev-worker-1, and cluster-dev-worker-2, each with its own IP, and kubectl get nodes lists all three as Ready. The cluster is added to ~/.kube/config for you.
container cluster load-image copies the local images onto every node, so there is no registry to push to. Then apply the repo’s manifests and see where the pods run:
container cluster load-image demo-api:latest
container cluster load-image demo-web:latest
kubectl apply -f deployment/
kubectl get pods -o custom-columns=POD:.metadata.name,NODE:.spec.nodeName
open http://cluster-dev.test:30080
The pods land on the two workers; the control plane runs none of them. The front end is a NodePort service on port 30080. The page took 15 to 25 seconds to load after the pods reported ready. Its list is empty, with “No notes yet”, because the cluster runs its own Valkey.
Delete the cluster when you are done; it removes all three node VMs:
container cluster deleteThe container-cluster-gateway README goes further, with Helm, Traefik, and a gateway container that serves the app at notepad.gateway.test.
What it does not do
Apple’s tool runs the same images as Docker. These Docker Desktop features have no match here:
- There is no
dockercommand and no Docker Engine API, so scripts and tools that call Docker need changes. Thecontainercommands are close (run,build,ls,rm,stats), but not the same. - There is no official Compose, so a multi-container app starts one container at a time, as the notepad did.
- Containers do not restart after a reboot. There is no restart policy, so you start them again yourself.
- Everything runs from the command line, with no app window.
Stop it and clean up
When you are done, stop the service. It shuts down every container and the tool’s own services:
container system stopTo remove everything from this guide, delete the DNS domain, the tools, and the data folder that holds the kernel, images, volumes, and machines:
sudo container system dns delete test
brew uninstall container kubernetes-cli@1.35
rm -rf ~/Library/Application\ Support/com.apple.container ~/.config/container ~/container-examples
If you installed with Apple’s package instead, run /usr/local/bin/uninstall-container.sh -d, which removes the tool and your data.
Troubleshooting
web.test does not load, or nginx in web exits at start. Names need both setup steps: the [dns] domain in config.toml with a service restart, and sudo container system dns create test. Without the second step, names fail between containers too. Start api before web. container run -d prints the container’s name even when the program inside quits right away, so check that the container still shows in container ls.
A published port (-p) resets every connection. macOS has not been allowed to give container-runtime-linux local network access. Allow it when macOS asks, or turn it on under System Settings, Privacy & Security, Local Network.
Containers lose their network while a VPN runs. An open issue reports routing to containers breaking when a VPN or an exit node adds its own default route (#1881). Disconnect the VPN and try again.
An image build fails on a Mac without Rosetta. The builder uses Rosetta by default (#1136). Install Rosetta, or add this to ~/.config/container/config.toml and restart the service so builds stay native ARM:
[build]
rosetta = false
container machine create ubuntu:24.04 fails with /sbin/init: not found. Stock images have no init system. Build Apple’s Dockerfile above, or use an image that includes /sbin/init.
systemctl prints Failed to connect to bus in a machine. The shell opened before systemd finished starting. Wait a few seconds and run it again.
Where it fits
For trying a Linux tool from a Mac, running a small multi-container app with names instead of ports, or keeping a Linux machine with systemd services next to your Mac files, Apple’s tool covers it for free. If your work depends on Compose files or tools that call docker or the Docker Engine API, it is not a drop-in replacement. If you would rather run full Linux or macOS VMs with their own desktops, our guide to throwaway macOS and Linux VMs with Tart covers another free Terminal tool, and our UTM, Parallels Desktop, and VMware Fusion comparison covers apps with a window for each VM.


