
You just unboxed a mini PC. The power cable is plugged in, the monitor is connected, and Windows is asking you to sign in with a Microsoft account. Somewhere in the back of your mind is a question you’ve been meaning to resolve since you hit “Buy Now”: should you actually use this Windows install, or should you wipe the whole thing before you get comfortable?
It is the most common post-purchase question in r/selfhosted, the Beelink forums, and the Minisforum subreddit. The advice is always contradictory. Half the comments say “just use it, it works fine.” The other half say “wipe it immediately, you don’t know what’s on there.” Nobody gives you a framework for deciding which camp you belong in. That is what this article is: a decision tree with three branches, each tailored to what you actually plan to do with this box. Pick the one that matches your situation, follow the steps, and get on with your weekend.
Before You Touch Anything: Check Your License
Regardless of which branch you take, the first thing worth doing is checking whether your Windows license is legitimate. Most mini PCs from established brands like Beelink, Minisforum, and Geekom ship with genuine OEM digital licenses that activate normally. But a small number of units arrive with volume licenses that were never meant for consumer hardware. How-To Geek has noted that some mini PCs ship with questionable Windows copies, and buyer forum threads on Eleven Forum confirm this is a real, if uncommon, concern.
To check, open an administrator Command Prompt and run slmgr /dli. You are looking for the “License Status” and channel description lines. If the status says “Licensed” and the description mentions “OEM” or “Retail,” you are fine. If you see “VOLUME_KMSCLIENT” or a similar volume channel description, that is a red flag: your license may have come from a grey-market bulk key rather than a legitimate OEM channel. You can also check Windows Settings under System, then Activation; if it says “Activated by your organization” instead of “Windows is activated with a digital license,” that points to the same issue. Run slmgr /xpr as well; it will tell you whether the activation has an expiration date. A permanent activation with an OEM description is the gold standard. If your license looks questionable, that changes the calculus. There is no point debloating and customizing a Windows install that might deactivate after the next major update. In that case, skip ahead to Branch 2 (clean reinstall with a known-good license) or Branch 3 (Linux, where licensing is not a concern at all).
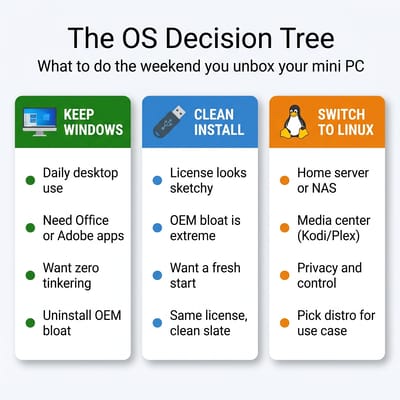
Branch 1: Keep the OEM Windows Install
This is the right choice if you bought the mini PC as a daily desktop, a media center for the living room, or a work machine that needs to run Microsoft Office, Adobe Creative Suite, or other Windows-exclusive software. It is also the right choice if you are not particularly interested in tinkering and just want the thing to work when you sit down Monday morning. The living room media center case is worth noting specifically: Windows handles Netflix in 4K with HDR through the Microsoft Store app on certified hardware, while Linux users typically hit Widevine DRM limitations that cap browser streaming at 720p. If your mini PC’s primary job is pushing content to a TV, keeping Windows avoids an entire category of headache.
The catch is that most OEM Windows installs ship with bloatware. You will find preinstalled antivirus trials, manufacturer utilities of dubious value, and the usual Windows 11 collection of Candy Crush Saga, Xbox Game Bar, and Clipchamp. None of this is dangerous, but it clutters the Start menu, consumes RAM, and makes the machine feel slower than it actually is.
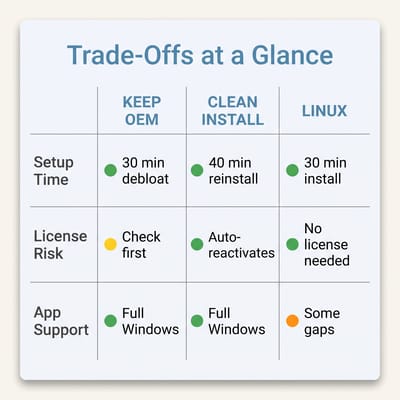
The fix takes about thirty minutes and uses only what is already on the machine. Open Settings, then Apps, then Installed apps, and walk the list. Right-click any preinstalled trial antivirus, Candy Crush, Clipchamp, the Xbox Game Bar, manufacturer utilities you do not recognize, and anything else you would not have installed yourself, and choose Uninstall. Most of the OEM bloat comes off this way without touching system components or trusting a third-party debloater. After that, three quick tweaks finish the job: disable Copilot suggestions in Settings, turn off Start menu recommendations under Personalization, and remove widgets from the taskbar by right-clicking it. These take another five minutes and eliminate most of the “this does not feel like my computer” friction that drives people to wipe their installs in the first place.
One more thing: check Windows Update before you settle in. OEM installs are often several months behind on cumulative updates, and running those updates early avoids the situation where Windows decides to restart during your first real work session. Let it finish updating, restart once, and then you are genuinely done. Your mini PC is ready for daily use.
Branch 2: Reinstall Windows Clean
This branch is for buyers who checked their license and found something questionable, or who simply want a guaranteed-clean starting point. It is also the right call if the OEM install has preloaded software you cannot remove through normal means, or if the system came with driver versions that cause instability.
The process is straightforward. Download the Windows 11 Media Creation Tool from Microsoft on another computer, create a bootable USB drive, and boot your mini PC from that USB. Choose “Custom install,” format the existing partition, and let Windows install fresh. The whole process takes 20 to 40 minutes depending on your drive speed.
The important detail is drivers. Most modern mini PCs will work fine with the generic drivers that Windows 11 installs automatically, but some hardware (particularly WiFi chips, Bluetooth modules, and audio codecs) may need manufacturer-specific drivers. DroiX maintains a collection of firmware downloads for popular brands including Beelink, Minisforum, and GPD. Download the driver pack for your model before you wipe the drive, and keep it on a second USB stick. If your WiFi does not work after the fresh install, you will need those drivers to get back online.
What about the license? If the original OEM license was a legitimate digital license tied to the hardware, Windows 11 should reactivate automatically after the clean install. The license is bound to the motherboard, not the drive, so formatting and reinstalling preserves it. If the original license was a volume key, it will not survive the reinstall, and you will need to purchase a retail license (roughly $139 for Windows 11 Home, $199 for Pro) or accept the unactivated state, which limits personalization but otherwise works fine.
After the reinstall, walk through the same Settings > Apps cleanup pass on the fresh install too. Even a clean Windows 11 install from Microsoft’s own media includes the standard bloatware package: Candy Crush, Clipchamp, the Xbox Game Bar, and a handful of other apps that Microsoft bundles by default. The cleanup step applies regardless of whether you kept the OEM install or started fresh. The main difference is that a fresh install gives you the cleanest possible Windows starting point with no mystery software from the manufacturer lurking in the background.
Branch 3: Switch to Linux
This is where the advice online gets noisy, because every Linux user has a favorite distro and a strong opinion about yours. The reality is simpler than the forum threads make it seem. The right distro depends on what you plan to do with the box, and there are only a handful of choices that matter for mini PC buyers in 2026. Before you commit, though, check one thing in your BIOS: make sure Secure Boot is set to a state your chosen distro supports. Ubuntu, Fedora, and Linux Mint all work fine with Secure Boot enabled. Some smaller distros do not. You can toggle it off in the BIOS if needed, but it is worth knowing before you start the installer.
If the mini PC will be a daily desktop replacement and you want the smoothest transition from Windows, Linux Mint is the answer for most people. It looks and works enough like Windows that the learning curve is gentle, it runs well on modest hardware, and reviewers have found it runs well on popular mini PCs like the Minisforum UM870, though some WiFi chips may need attention out of the box. If you want a more modern, productivity-focused desktop, Pop!_OS from System76 includes built-in tiling features that make multi-window work genuinely faster, and it handles the AMD Radeon and Intel Arc graphics found in most mini PCs without extra fuss.
If the mini PC is destined for home server duty (running Docker containers, a Plex media server, Home Assistant, or a NAS), Debian is the workhorse. It is the most stable option, receives security updates for years, and every self-hosting tutorial on the internet assumes you are running it. For a living room gaming console running Steam, Bazzite delivers a SteamOS-like experience that boots straight into Big Picture Mode and handles controller input, emulation, and game updates without requiring you to think about the underlying OS. Performance varies by title; one reviewer measured roughly 77 percent of Windows frame rates in Cyberpunk 2077 as a representative example, though some games close the gap and others widen it.
The catches are real, and you should test before you commit. The safest approach is to boot your chosen distro from a USB stick first (a “live session”) and check that WiFi connects, Bluetooth pairs, audio works through both speakers and HDMI, and your monitor runs at its native resolution. This takes fifteen minutes and costs nothing. If everything works in the live session, the full install will work too. If something fails (and WiFi 7 chips from MediaTek are a common offender in 2026), you will know before you have wiped anything.
Software compatibility is the other catch. Adobe Photoshop, Microsoft Access, and many enterprise VPN clients have no native Linux version and run poorly or not at all through compatibility layers like Wine. If your work depends on these tools, Linux is not the right branch for you. We have a deeper dive into which mini PCs work best with Linux and a comprehensive guide to choosing the right distro for your situation if you decide this is your path.
The Fourth Path: Dual-Boot
Dual-boot deserves a mention even though it is not ideal for most mini PC buyers. You can partition your drive and run both Windows and Linux side by side, choosing which to boot each time you start the machine. This sounds like the best of both worlds, but in practice it introduces friction: Windows Update occasionally overwrites the Linux bootloader (GRUB), disk space is split between two operating systems instead of dedicated to one, and you find yourself gravitating toward whichever OS you booted last and never switching. For mini PCs with a single 512GB NVMe drive, the space constraint alone makes dual-boot awkward. If you have a 1TB or larger drive and genuine daily needs in both operating systems, it can work. For most buyers, picking one OS cleanly is the less frustrating path.
What Happens If You Pick Wrong
Here is the candid version: picking wrong is not catastrophic, but it is not free either. Switching from Windows to Linux is straightforward: you format the drive and install, just like the Branch 2 process. Going the other direction, from Linux back to Windows, requires a Windows license you may no longer have. If you wiped a legitimate OEM install to try Linux and then want to go back, the digital license is usually still tied to your motherboard and will reactivate. But if the original license was sketchy and you discarded it, you are looking at buying a retail copy.
The deeper cost is time. Every hour you spend configuring one operating system (installing software, setting up file shares, tweaking system preferences, building Docker containers) is an hour you lose if you switch. The 5 things mini PCs struggle with are the same regardless of OS; what changes is whether the OS itself gets in your way or gets out of it. The best time to make this decision is right now, before you have three months of muscle memory and a carefully organized desktop that you would rather not rebuild.
One more option worth noting for buyers who have not purchased yet: System76’s Meerkat ships with Pop!_OS ready to go, no Windows wipe required. A handful of other vendors, including Geekom’s Linux-compatible lineup, market their hardware as Linux-friendly even though the boxes still ship with Windows 11 Pro by default; the value there is documented driver support rather than a true Linux-first SKU. If you know you want Linux before you buy, the Meerkat skips the entire decision tree.
For everyone else: most buyers who treat their mini PC as a desktop replacement will be happiest keeping Windows and debloating it. Most buyers who treat it as a headless server, media center, or homelab node will be happiest on Linux. And the ones who end up frustrated are almost always the ones who chose based on what they wished they would use the machine for, rather than what they actually will. Be candid with yourself about that distinction, make the call, and enjoy the rest of your weekend.


